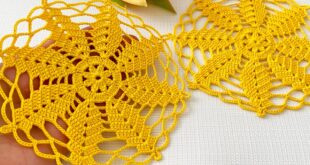
This crochet fan lace tape (also called “crochet lace strip” or “doily tape lace”). It’s worked in one continuous strip, creating repeating oval motifs with fan shapes that join together as you go.
Below is a full step-by-step written pattern you can follow 👇

🧶 Materials:
- Size 10 crochet thread (cotton)
- Crochet hook 1.25–1.5 mm
- Scissors, needle for finishing
🌸 Crochet Fan Lace Tape Pattern
🔹 Foundation:
Ch 14.
🔹 Row 1:
- Dc in 5th ch from hook (this counts as 2 dc together).
- Ch 2, skip 2 ch, dc in next ch, ch 2 — repeat across.
- You should have 5 open spaces (ch-2 spaces). Turn.
🔹 Row 2:
- Ch 3 (counts as dc), 2 dc in 1st ch-2 space, ch 1.
- In next ch-2 space: 3 dc, ch 1 — repeat across all spaces.
- You’ll have small 3-dc groups across. Turn.
🔹 Row 3 (Fan Base):
- Ch 3, 1 dc in first dc, ch 1.
- (2 dc, ch 1) in each ch-1 space across, but in the center space, make (2 dc, ch 2, 2 dc).
- Continue (2 dc, ch 1) across remaining spaces. Turn.
🔹 Row 4 (Fan Arches):
- Sl st into first ch-1 space, ch 3.
- (2 dc, ch 1, 2 dc) in each ch-1 space, and in the center ch-2 space make (3 dc, ch 2, 3 dc).
- Continue same pattern on the other side.
You’ll see a semi-circle fan forming.
🔹 Row 5 (Mesh band for next motif):
- Ch 5, skip 2 groups, dc in next ch-1 space, ch 2 — repeat 3–4 times to form a rectangular mesh.
- Turn, ch 5, dc in ch-2 space, repeat to create about 5–6 rows of mesh (depending on how long you want between fans).
This section connects one fan motif to the next.
🔹 Repeat Rows 1–5
Repeat the fan motif pattern to create a continuous lace tape of any length.
🪡 Finishing:
- Block the lace gently to flatten the fans and open the spaces.
- You can use it as trim, edging, bookmark, or even join multiple strips to make garments or table runners.
Would you like me to draw a crochet diagram (chart) for this pattern (like a lace symbol chart)?
It will make the fan stitch layout much easier to visualize.
That lace strip you’re showing is a fan-motif tape lace.
You work each little oval/fan section right after the previous one, so it becomes one long ribbon.
🧶 Materials
• Cotton crochet thread No 10
• Steel hook 1.25 mm (or to match thread)
• Scissors • Tapestry needle
🌼 Pattern (one repeat ≈ 1 motif)
Foundation: Ch 14.
Row 1 – Mesh base
Dc in 5th ch from hook (1 open space made).
Ch 2, skip 2 ch, dc in next ch – repeat to end. (You have 5 ch-2 spaces.) Turn.
Row 2 – Dc groups
Ch 3 (counts as dc), 2 dc in first ch-2 space, ch 1.
(3 dc, ch 1) in each ch-2 space across. Turn.
Row 3 – Fan base
Ch 3, dc in same st, ch 1.
(2 dc, ch 1) in each ch-1 space across, but in the center space make (2 dc, ch 2, 2 dc).
Continue (2 dc, ch 1) to end. Turn.
Row 4 – Fan arches
Sl st into first ch-1 space, ch 3.
(2 dc, ch 1, 2 dc) in each ch-1 space; in the center ch-2 space work (3 dc, ch 2, 3 dc).
Continue symmetrically to end. This forms the oval fan. Turn.
Row 5 – Bridge to next fan
Ch 5, skip 2 groups, dc in next ch-1 space, ch 2 – repeat 3–4 times to make a mesh band ≈ 5 rows tall (or desired length).
This mesh becomes the flat section between fans.
Repeat Rows 1–5 for as many motifs as you like.
✂️ Finishing
Fasten off, weave in ends, wash and pin flat to dry (block it) so the fans open nicely.
Would you like a symbol chart (diagram) for this repeat? It makes it much easier to follow visually.